What Is The Process Of Building A Custom Home?

Table Of Contents
Share

Last updated: April 6, 2026

Most first-time custom home buyers underestimate the timeline by four to six months. They plan around the construction itself and forget that design, permitting, and financing can take just as long before a single shovel touches the ground.

After 30 years of building custom homes in the Houston area, we've seen this pattern repeat more times than we can count. The families who come in prepared move through the process with confidence. The ones who don't get caught off guard by steps they didn't know existed.

This guide walks you through every stage of the home building process in Texas, from setting your budget to the day you get your keys. Whether you're just starting to research or you've already narrowed down your lot options, this is the roadmap you need.

Key Takeaways:

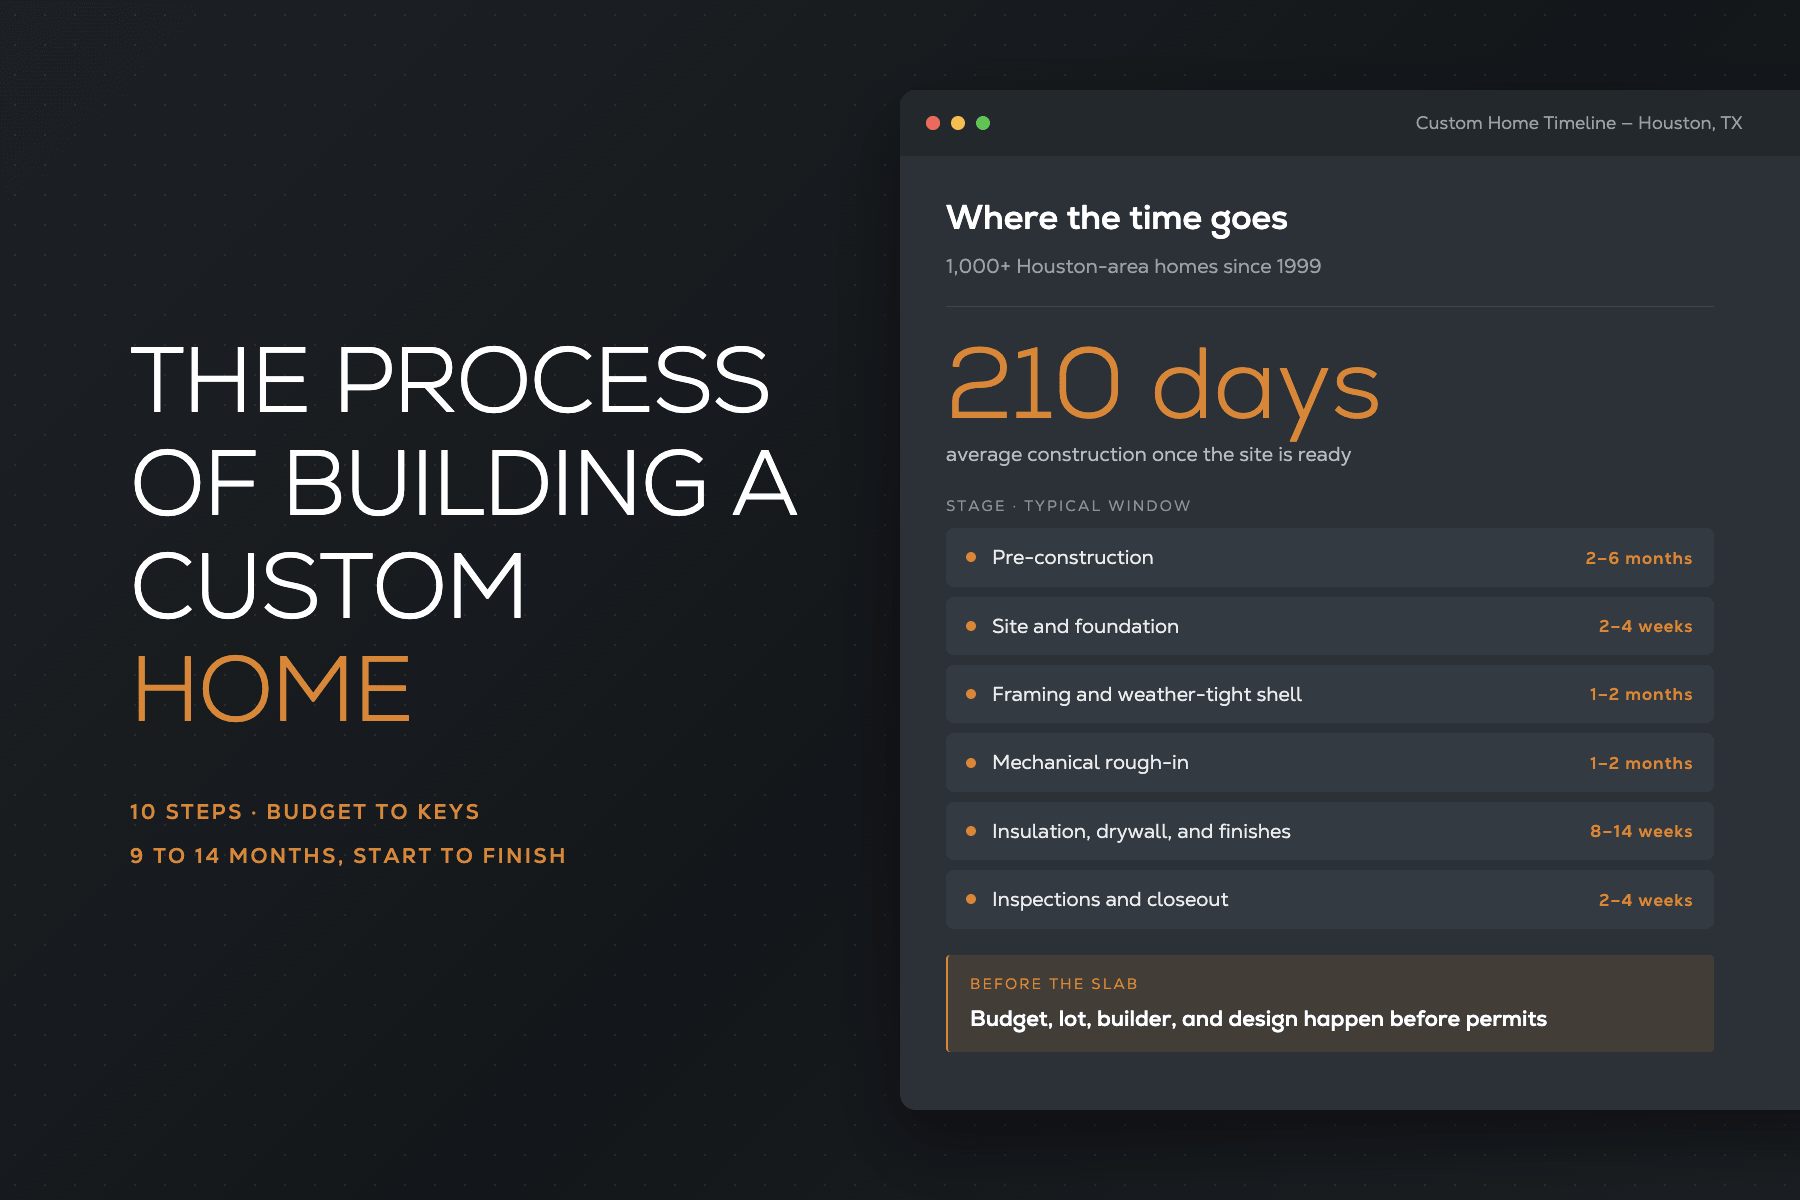
  • A custom home in Texas typically takes 7 to 12 months to build from breaking ground to move-in, with pre-construction adding another 2 to 6 months on top of that.
  • Design and permitting often take as long as the construction itself, and delays here are the most preventable.
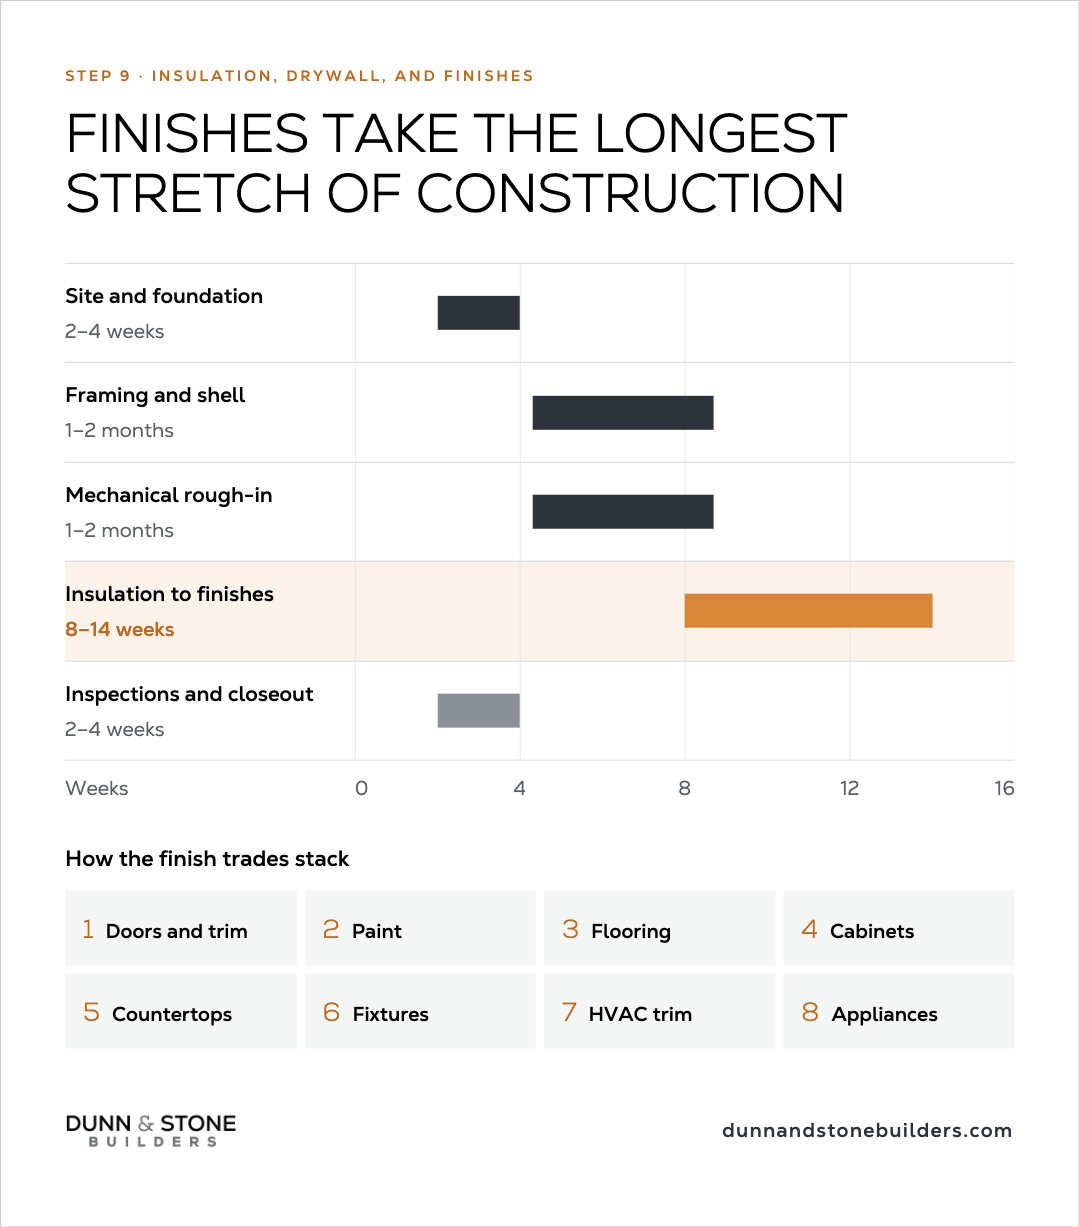
  • The finishes stage is the longest single construction step, often accounting for more than 25% of the total build timeline. Locking in your selections before breaking ground is the single best way to protect your schedule.
  • Working with an experienced local builder reduces timeline risk and eliminates the most common first-timer mistakes.

What Does the Home Building Process Look Like, Start to Finish?

Before getting into each step in detail, it helps to see the full arc of the process.

Building a home in Texas moves through three broad stages: pre-construction (financing, design, and permitting), active construction (site work through finishes), and closing (inspections, walkthrough, and move-in). Most of the decisions that affect your timeline and budget happen in the first stage, before anything is built.

Here's what that looks like step by step.

Step 1: Set Your Budget and Secure Financing

You can't design the right home without first knowing what you can spend. Financing comes before everything else.

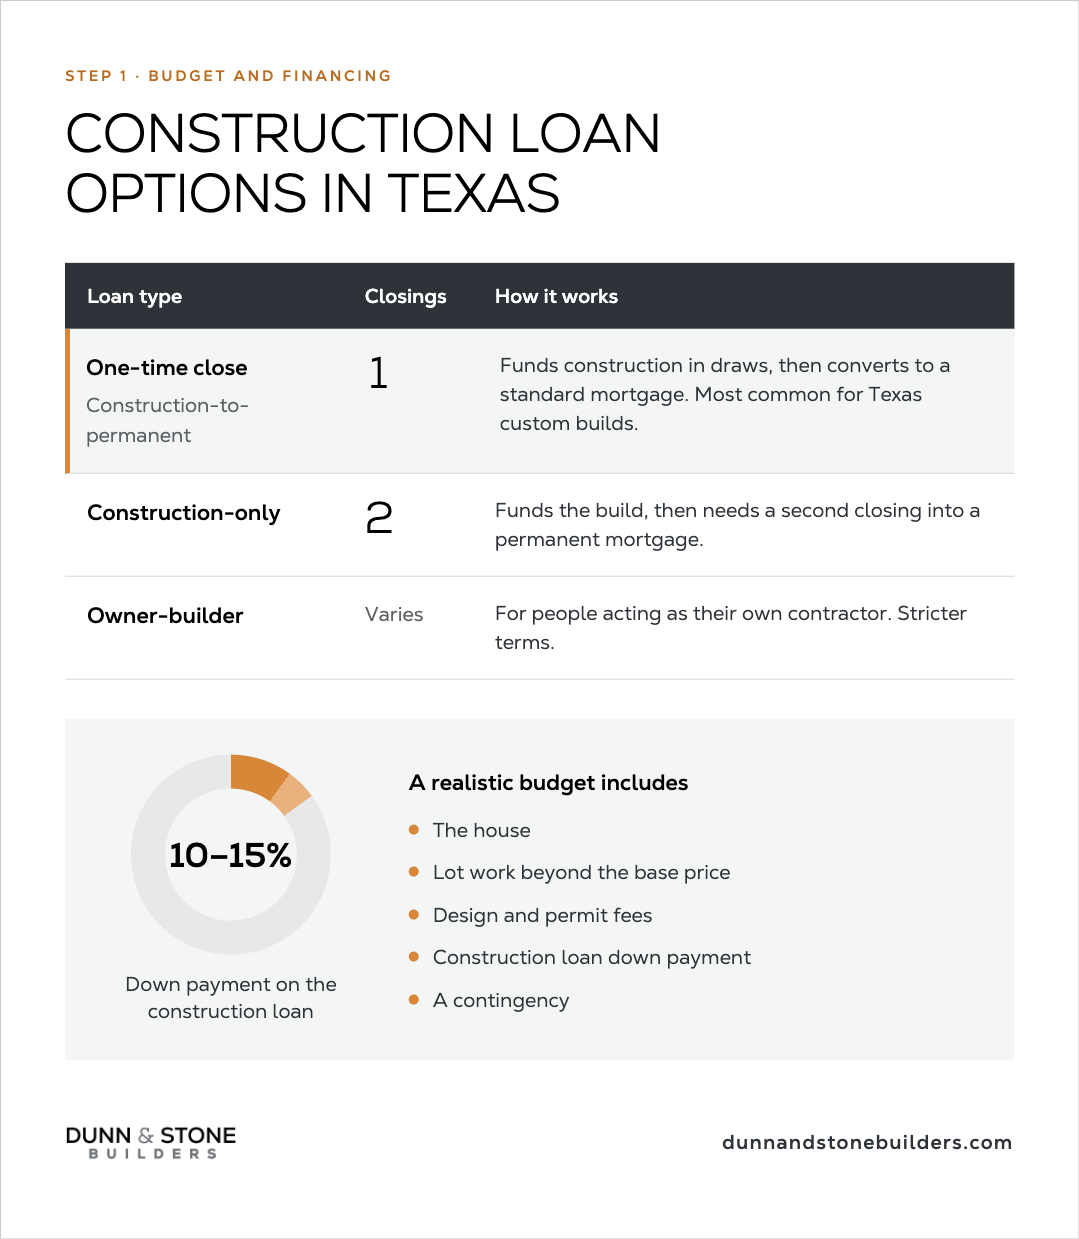
Before you choose a floor plan or visit a lot, you need to know how much you can spend and how you plan to pay for it. Most people building a custom home in Texas use a construction-to-permanent loan, sometimes called a one-time close loan. It covers the land purchase and construction costs, then converts into a standard mortgage when the home is complete.

If you qualify, an FHA construction loan is another option worth exploring. FHA loans allow lower down payments (as low as 3.5% with a 580+ credit score) and are government-backed, which gives lenders more flexibility on approval criteria. The one-time close version covers everything from land to permanent mortgage in a single closing, reducing paperwork and closing costs.

When building your budget, plan for more than just the construction itself. A realistic budget accounts for:

  • Land purchase and site prep: clearing, grading, utility connections, and drainage work
  • Design and permitting fees: architectural drawings, engineering reports, and permit applications
  • Construction costs: typically $150 to $300+ per square foot in the Houston area, depending on finishes and design complexity (see our full breakdown of how much it costs to build a house)
  • Contingency fund: set aside 10 to 15% of the total budget for unexpected costs
  • Taxes, insurance, and HOA fees: Texas property taxes can significantly affect your monthly payment once the home is complete

Getting pre-approved before you start designing saves time and prevents falling in love with a floor plan that's outside your budget. Once financing is lined up, you're ready to start evaluating land. If you'd like to talk through your numbers with our team first, schedule a free consultation at any point in this process.

Step 2: Find and Evaluate Your Lot

Where you build matters as much as what you build. In fact, securing the right lot is so important that we've created a guide with tips to help you make sure you're choosing the right land.

If you already own land, this step is done. If not, finding the right lot should happen in parallel with your builder search, not after it. A good builder can help you evaluate whether a piece of land fits your plans before you commit to it, and flag problems that aren't obvious from a drive-by.

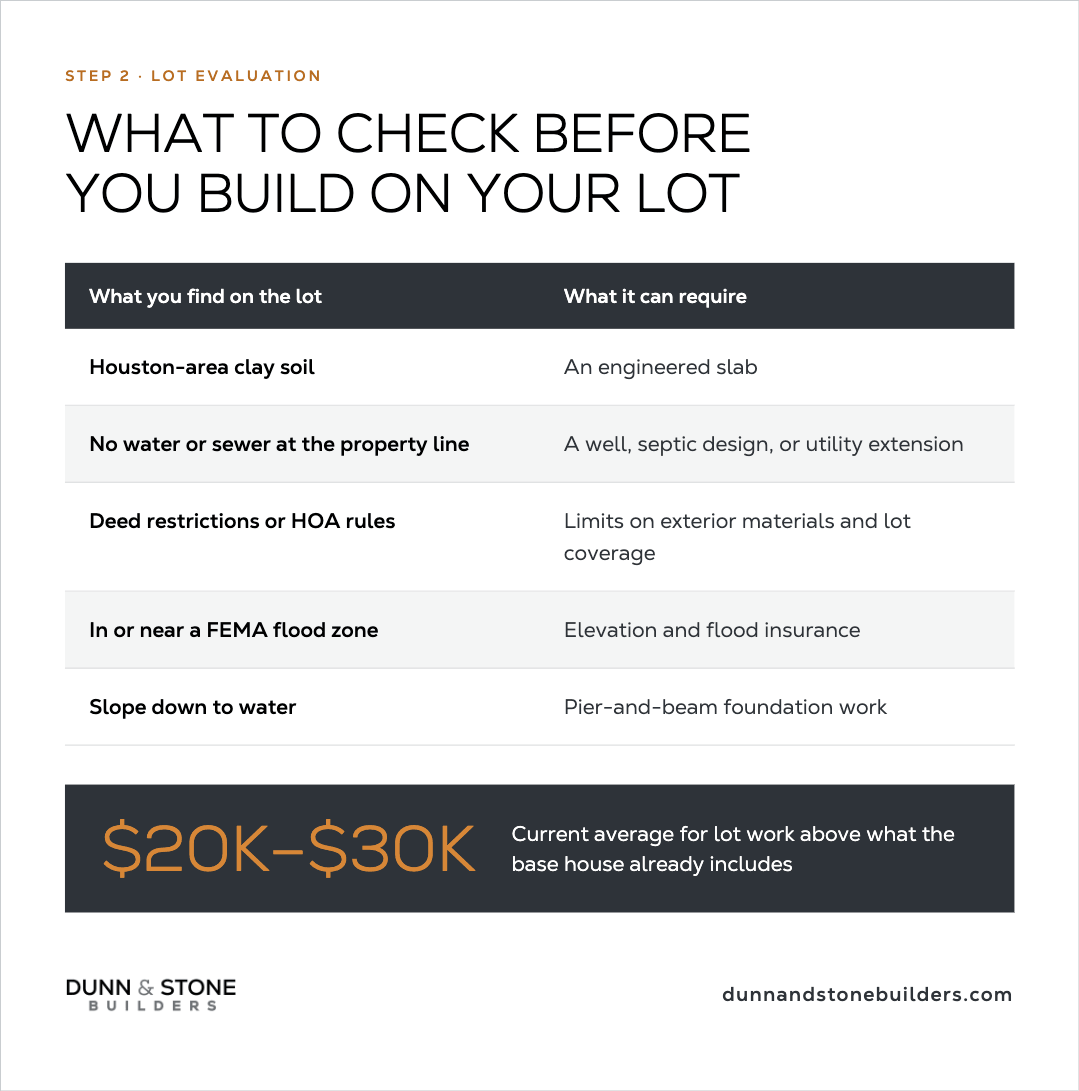
When evaluating land in Texas, think beyond location and price. A few specific factors can affect both your budget and your timeline significantly:

Soil conditions vary across Texas. In the Houston area, heavy clay soils are common and often require engineered foundations or extra site preparation. A soil assessment early in the process can prevent expensive surprises after the slab is poured.

Utility access is a key variable. Some lots have water, sewer, and electricity already at the property line. Raw land in rural or semi-rural areas may need a well, septic system, or utility extension (each of which adds cost and time).

Zoning and deed restrictions determine what you can build and how. Some communities have HOA requirements around architectural style, exterior materials, or lot coverage. A builder with local experience can flag these issues before they become problems.

Flood zone status is especially relevant in Southeast Texas. Lots in or near FEMA-designated flood zones may require flood insurance and elevated foundations, both of which affect your budget and your build.

Dunn & Stone Builders works across communities in Montgomery and Harris County and can help you evaluate lot options that fit your floor plan and budget before you make an offer. (If you're not familiar with the newest home developments in Houston, this guide has some great options to act as a starting point).

Work with your home builder and a general contractor to make sure your lot is right for the home you intend to build. If you’re unsure of where to look for land, see the list of neighborhoods where we build as a starting point.

Once you've got a clear sense of where you want to build, the next decision is who you want building it.

Step 3: Choose Your Builder

The builder you hire will shape every other part of the home building process: the timeline, the quality, and how much you enjoy (or dread) the experience. (if you're curious, you can learn more in our article about the benefits of hiring house builders in your area).

A good builder does more than construct walls. They manage subcontractors, pull permits, coordinate inspections, communicate with you regularly, and problem-solve when things don't go according to plan. Choosing the right team is one of the most consequential decisions you'll make.

When interviewing builders, weigh these factors carefully:

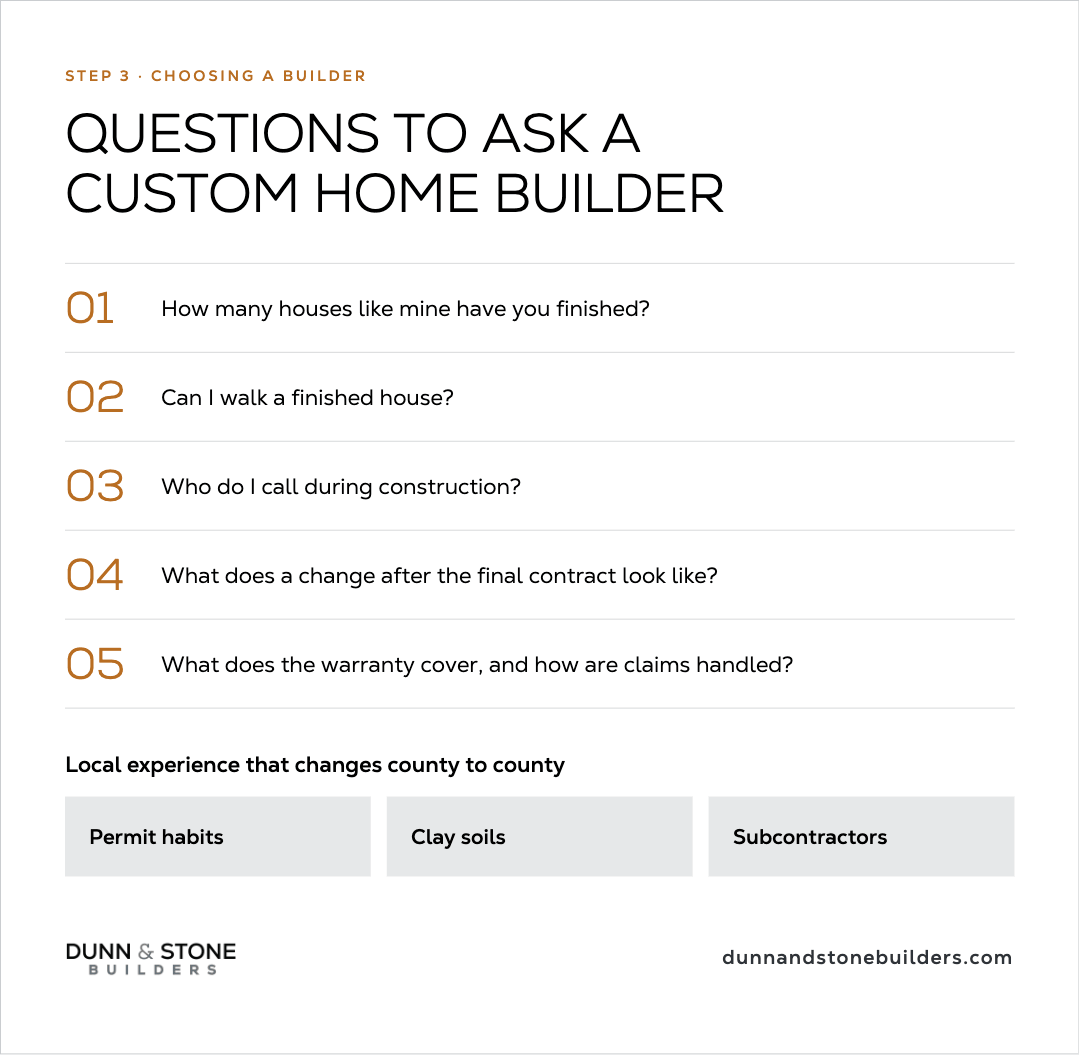
Experience with your type of project. A builder who specializes in production homes may not be the right fit for a custom build with detailed specifications. Ask specifically how many homes like yours they've completed, and ask to tour one.

Local knowledge. A builder with experience in your county understands local permitting timelines, common soil and site conditions, and has working relationships with local subcontractors. In fast-growing areas around Montgomery and Fort Bend Counties, permit backlogs are real. Established county relationships make a measurable difference.

Communication and process. Ask what a typical week of updates looks like. How do they handle changes or unexpected costs? Who's your main point of contact during construction? Clear, specific answers are a good sign. Vague ones are a warning.

References and recent work. Photos on a website tell you little about actual construction quality. Ask to walk through a home they've completed recently. Pay attention to how the details were handled, not just how the finished product looks from the street.

Warranty and post-move support. Ask specifically what the warranty covers, how long it lasts, and what the process is for submitting claims after move-in. A builder who's confident in their work will answer this question without hesitation. If you'd like to see how we answer it, meet our team and learn about how we work.

For more on how to choose the right builder, see our article here.

With your team selected, you're ready to design.

A photo of the outdoor area and pool at a custom home in Houston

Step 4: Design Your Home

For many families, this is the most enjoyable part of the entire process, and also the one where costly mistakes get baked in early if you're not careful.

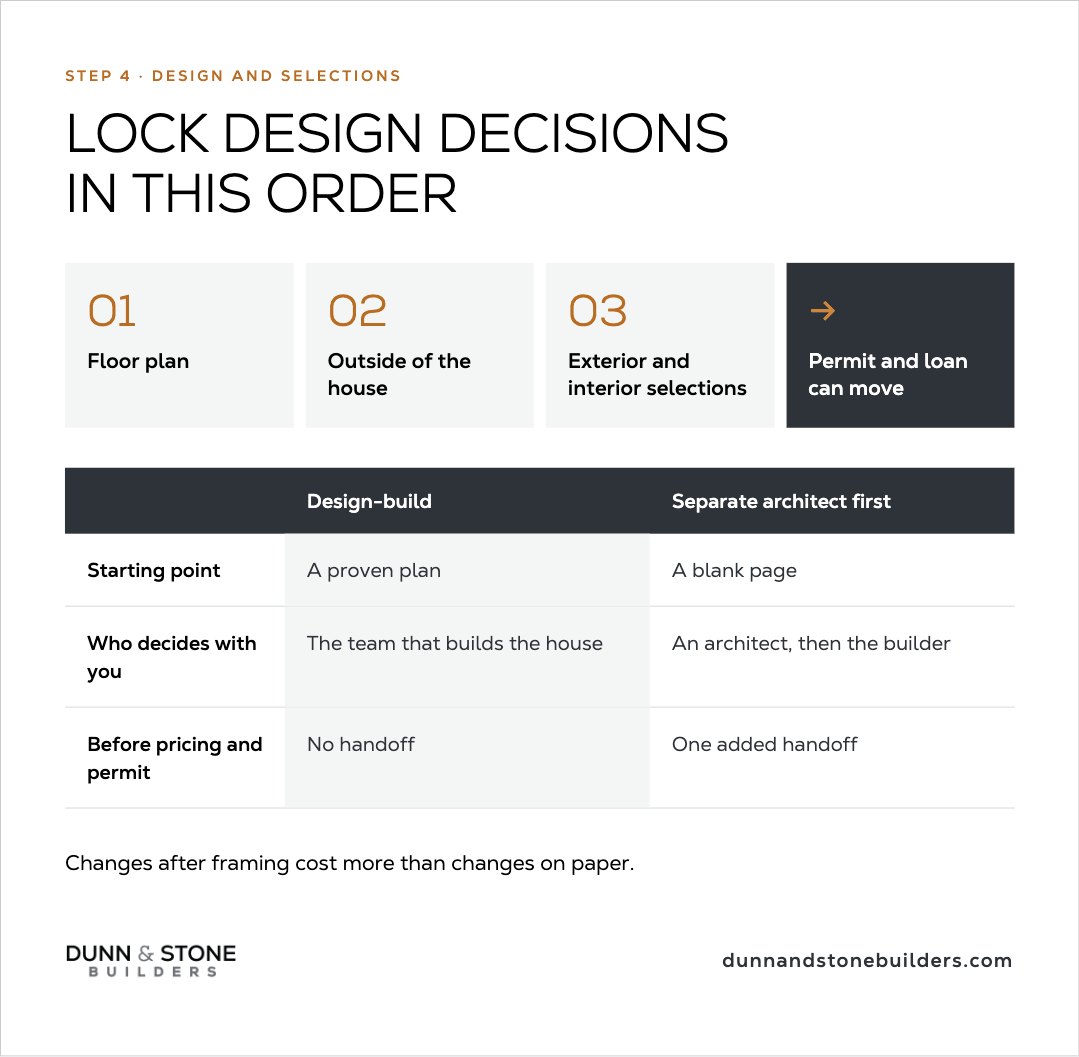
For custom and semi-custom builds, the design stage covers everything from selecting a floor plan to finalizing exterior elevations, interior finishes, cabinetry, flooring, and fixtures. Depending on how many decisions need to be made, it can take several weeks to several months.

If you're working with a design-build firm, your builder's team guides you through the process from start to finish. You start by selecting a floor plan from a catalog of proven designs (explore our floor plans and pricing), then work with the design team to customize the exterior style, interior finishes, and any special features your family needs. It's typically faster and involves less coordination overhead than working with a separate architect and builder.

If you're working with a separate architect, you'll develop plans first and then bring them to a builder for pricing and construction. It offers maximum design flexibility but requires careful handoff between the two teams and tends to take longer overall.

A few decisions carry outsized importance regardless of which path you take:

Finalize your selections before breaking ground. Special-order materials, custom cabinetry, and imported finishes can add weeks or months to your timeline if they're not ordered in advance. Decisions left open at the start almost always cause delays during construction.

Plan for long-term functionality. Custom homes are built once. Now is the time to add aging-in-place features, a dedicated home office, a dual primary suite, or anything else your family needs now or might need in ten years.

Resist the urge to change things after framing begins. Changes during active construction cost significantly more than changes on paper. Work through those decisions now, while there's no cost penalty for revising them.

With plans finalized and reviewed, the process moves into permits.

Step 5: Secure A Construction Loan

Financing gives your builder the funds they need to keep progressing while effectively managing costs during your home's construction. Here are some of the most common types of financing for custom-built homes in Texas.

Common Types of Construction Loans

  • Construction-to-Permanent Loan: This loan automatically converts to a mortgage once your home is ready. During construction, you only pay interest on the drawn amount. The benefit here is an easy transition from construction to homeownership. The drawback is less flexibility if you decide to change lenders.
  • Construction-Only Loan: This is a short-term loan that covers only the construction period. You must pay off or refinance into a permanent mortgage after the build. It offers flexibility for obtaining a separate mortgage, but requires two closings (which can increase total costs).
  • Owner-Builder Loan: This option is perfect for people who build their own homes without involving another builder. It grants total control over the construction, but it is riskier for lenders. This is why it usually has stricter approval conditions.
  • Renovation Loan: This choice is suitable if you plan to purchase and renovate a property. It combines the cost of buying and remodeling into a single loan. However, funding limits and oversight can restrict how you use it, so it may not be ideal for most home buyers.

Once you obtain a loan based on your needs (see our article on the subject for more information about how to determine which loan is best for you), it's time to sign a purchase agreement with your custom home builder.

This agreement marks the official start of the construction phase. It clarifies the project timeline, budget, and the specific roles and responsibilities of all everyone involved.

With financing in place, you can start to collaborate with your builder's design team. They'll work with you to choose the materials and finishes that define the look and feel of your new home. This part of the process is where you personalize your space and make sure that the construction sticks to your agreement with the builder.

Step 6: Choose Materials And Finishes

The materials and finishes you choose influence your home's final look and affect the overall costs and longevity of the construction.

When choosing materials, it's important to find a balance between quality and cost. Using the cheapest materials might save you money upfront, but they often come with lower durability. This usually means higher maintenance or replacement costs down the line.

On the other hand, high-end or sustainable materials can enhance the look and feel of your home. But they might be very expensive or hard to find, which can cause delays in your build timeline.

Work closely with your custom home builder to determine which materials to use. Experienced builders have in-depth knowledge about which offers the best value for money. Their job is to steer you towards products that fit your vision and can stand up to structural requirements/climate conditions in your area.

Interior shot of a living room in an unfurnished custom home in Texas

Step 7: Get Your Plans Approved

Once you've finalized the design of your new home, you must have plans reviewed and approved by a committee of architects and building officials. This approval process makes sure your home’s design meets all building codes and local regulations. It also proves that your new home is structurally sound.

The review committee will examine every aspect of your plans, from the foundation to the roof. They'll check the details of site preparation, structural integrity, and even compliance with environmental standards.

Once your plans receive approval, you can move forward to the build phase of the construction process.

Step 8: Permits and Pre-Construction

Most buyers are surprised by how much has to happen before the first crew shows up on site.

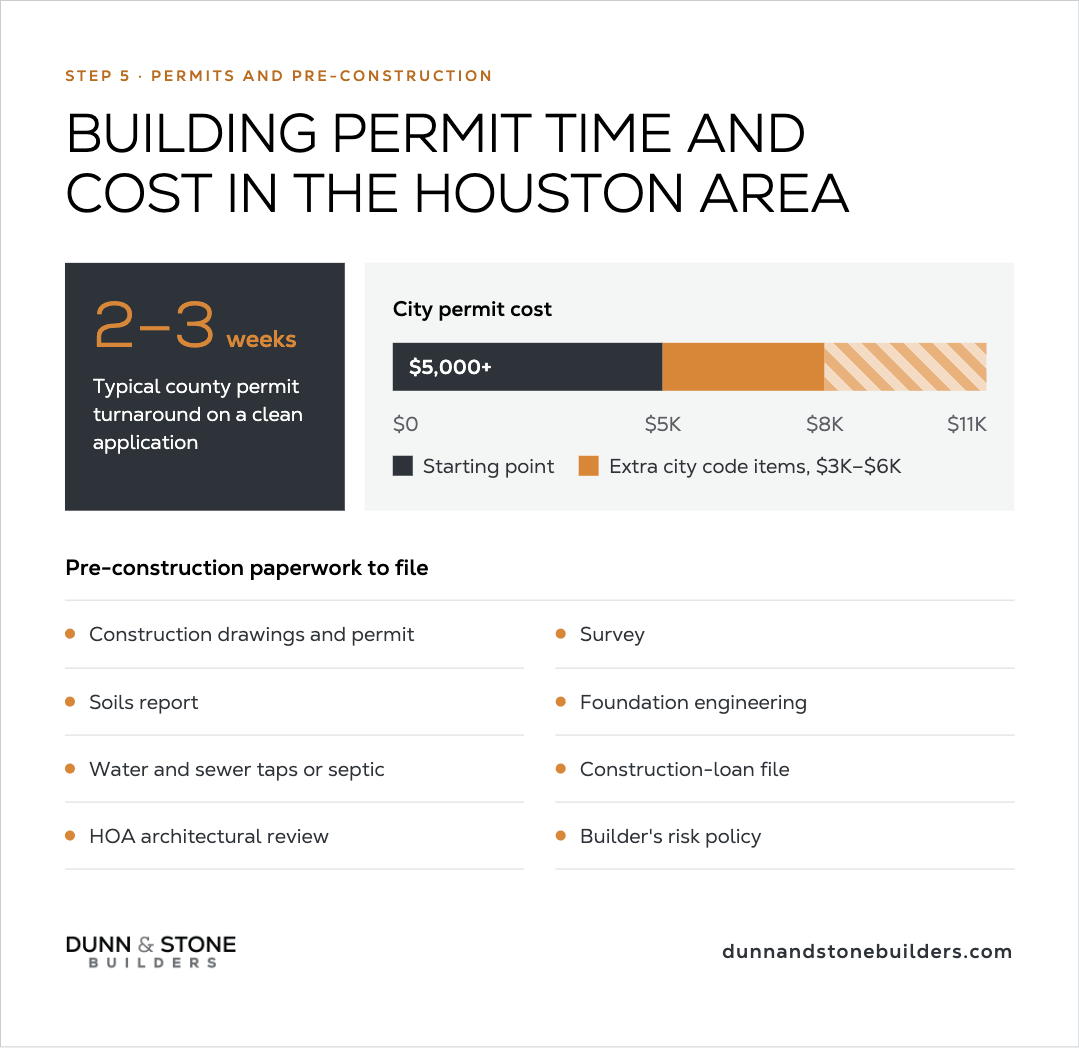
Your builder will submit your construction plans to the local permitting authority and apply for the necessary building permits. Depending on where you're building in Texas, this can take anywhere from a few weeks to a couple of months.

Permit timelines vary significantly by county and municipality. Some suburban communities issue permits quickly. Others (particularly fast-growing areas around Montgomery and Fort Bend Counties) can run longer due to high application volume. Starting the permit process as soon as your plans are finalized is one of the most effective ways to protect your overall timeline.

Beyond permits, this stage also includes:

  • Final engineering review of structural plans, especially if your lot has specific soil or drainage requirements
  • Utility coordination to ensure water, sewer, gas, and electricity will be accessible when needed during construction
  • HOA approval if your community requires architectural review before permits are issued
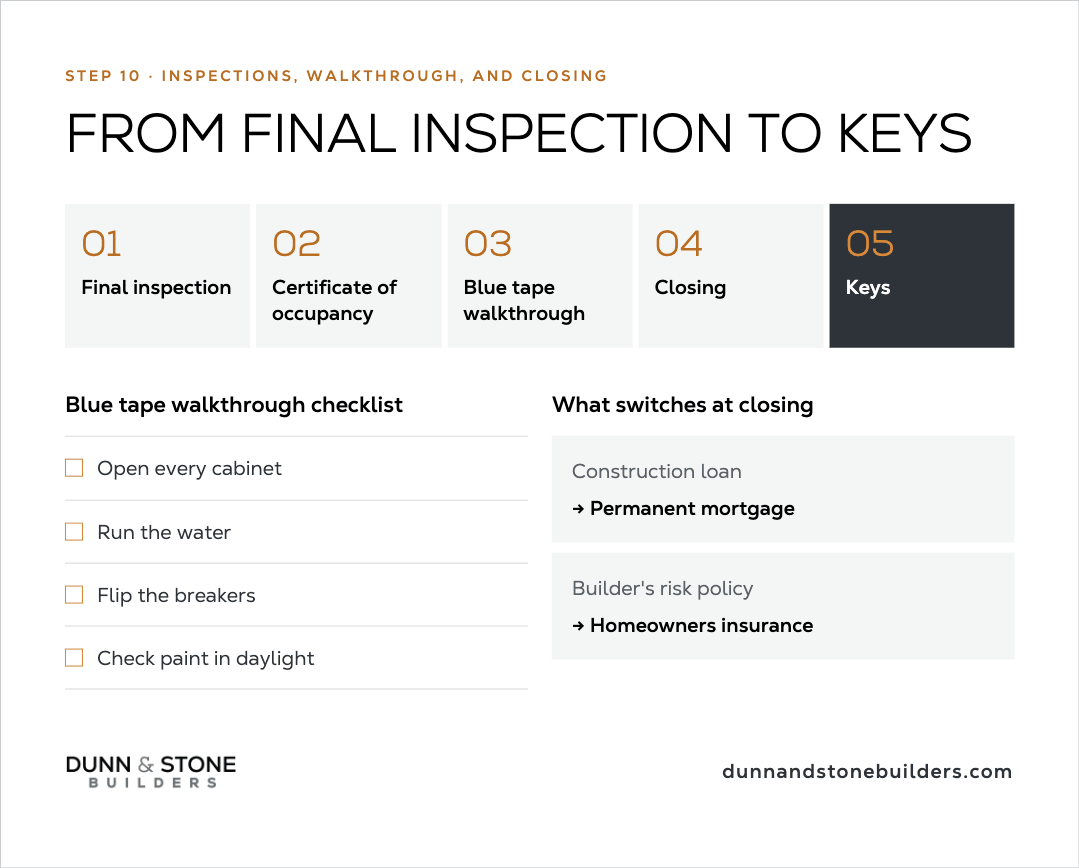
  • Builder's risk insurance to protect the project during construction, transitioning to homeowners insurance once the home is complete

Getting financing and permits in place before breaking ground keeps the project on schedule. Waiting on either one after construction is ready to start can push your timeline back by weeks or more.

With permits in hand, the build begins.

Step 9: Site Preparation and Foundation

Construction starts not with walls, but with the ground beneath them.

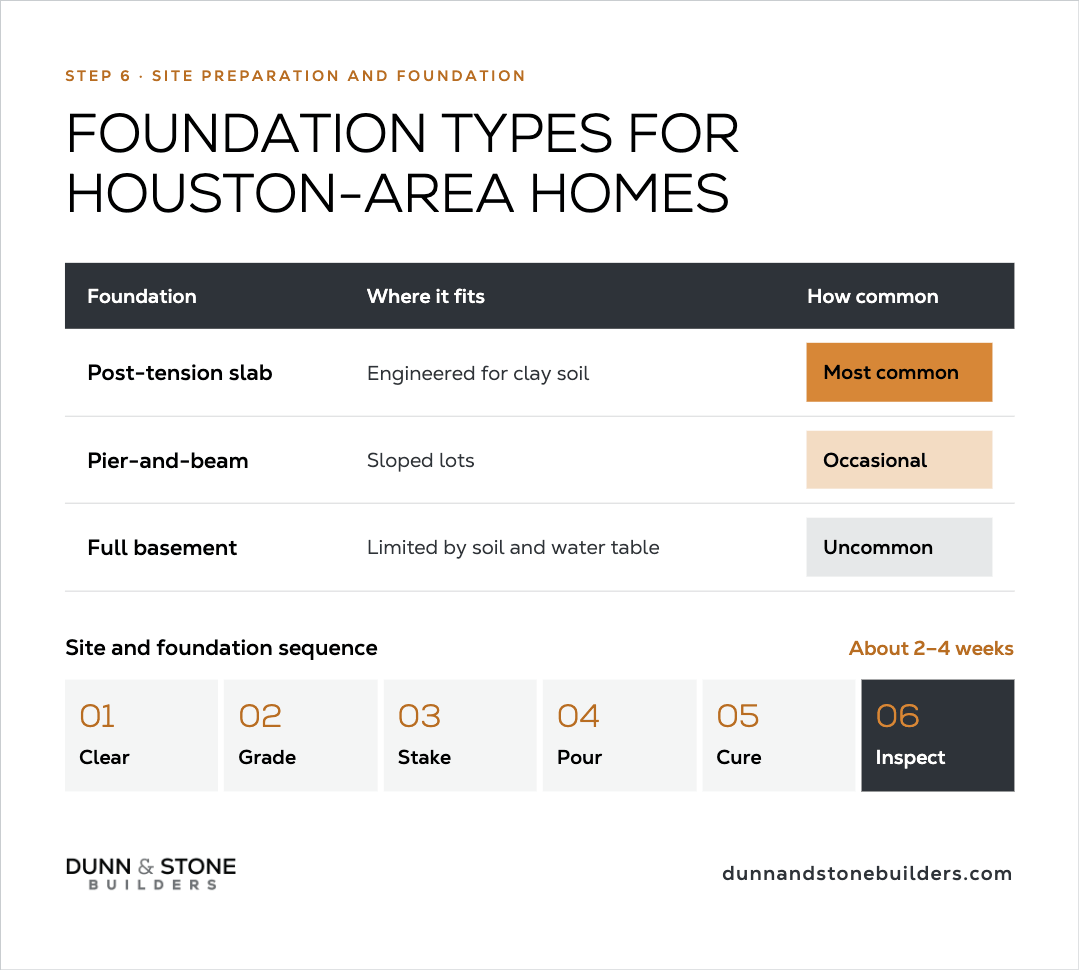
The crew clears the lot first, removing trees, debris, and any existing structures. The land is graded to establish proper drainage, directing water away from the home's footprint. Once grading is complete, the foundation is staked out and excavated.

In Texas, the most common foundation types are:

  • Post-tension slab: a reinforced concrete slab common in Houston and surrounding areas, particularly well-suited for the clay-heavy soils found throughout Southeast Texas
  • Pier and beam: an elevated foundation that allows access beneath the home, more common on sloped lots or in older construction
  • Full basement: less common in Southeast Texas due to soil conditions and water table levels

After the concrete is poured, it needs time to cure before construction moves forward. A city or county inspector then verifies that the foundation meets local code requirements. Houston-area clay soils expand and contract significantly with moisture changes. This is why engineered foundations are standard here, not optional. Cutting corners at the foundation level is one of the most expensive mistakes in residential construction, because nothing above it can be fixed without addressing what's below.

Timeline for this phase: about 2 to 4 weeks in most projects.

Once the foundation clears inspection, the house starts rising above ground.

Step 10: Framing

Few moments in the building process are more exciting than framing week, when an empty lot suddenly starts looking like a home.

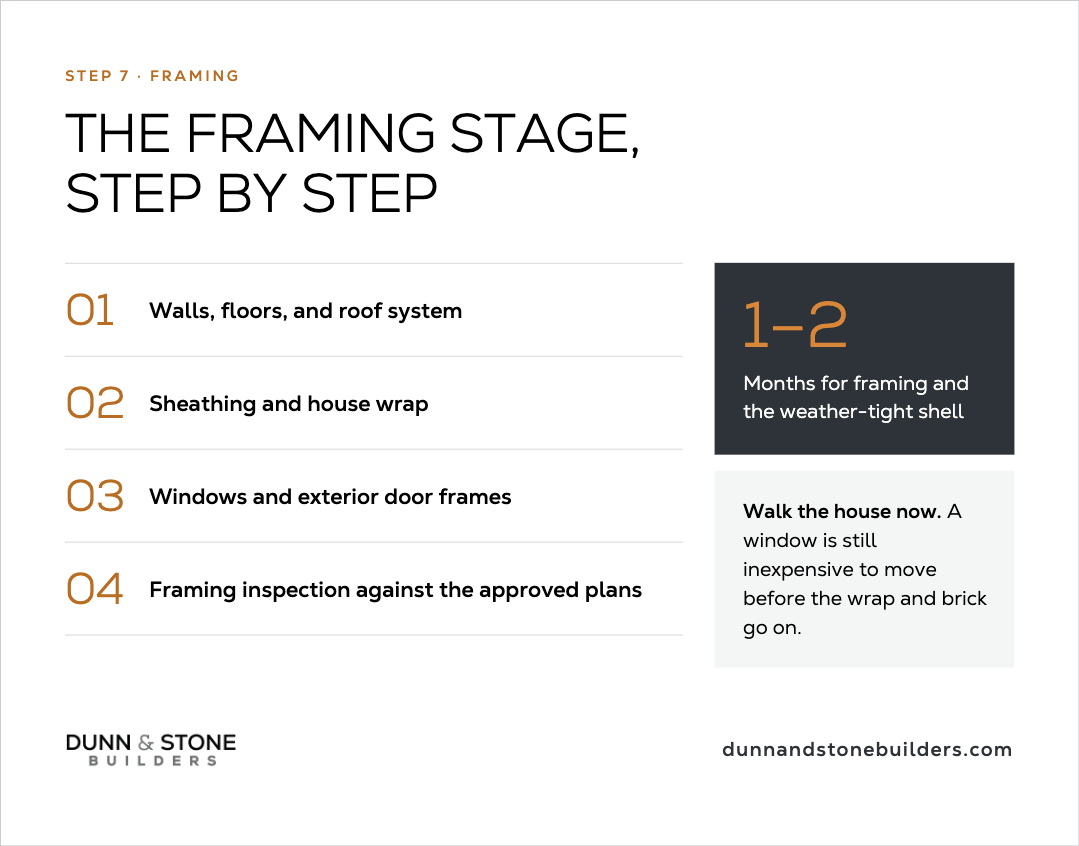
The structural skeleton goes up during this stage. Walls, floors, and the roof system are constructed using lumber or steel framing components. Exterior wall sheathing is applied, then covered with a house wrap: a protective barrier that keeps liquid water out of the wall cavity while still letting moisture vapor escape, which reduces the long-term risk of mold and wood rot. Windows and exterior door frames are set as well.

If your home has special structural features like vaulted ceilings, large open spans, or a complex roofline, this is where those elements take shape. A framing inspection follows, verifying that the structure meets code and matches the approved plans.

Pro tip: Visit your home during framing if your builder allows it. Seeing the layout in three dimensions often reveals things the blueprints didn't make obvious (a window that should shift, a wall that feels tighter than expected) while changes are still relatively inexpensive to make.

Timeline for this stage: typically 1 to 2 months.

With the frame approved, the crew moves inside to rough in the mechanical systems.

Step 11: Plumbing, Electrical, and HVAC Rough-In

Called the "rough-in" because all of it gets hidden behind drywall later, this stage is one of the most important to pay attention to as the homeowner.

Your plumber, electrician, and HVAC contractor work simultaneously to run pipes, wires, and ductwork through the walls and floors. Specifically:

  • Plumbing: water supply lines, drain and waste pipes, and rough-in stubs for sinks, toilets, showers, and appliances
  • Electrical: service panel, wiring runs to all outlets, switches, fixtures, and specialty circuits (EV chargers, home theaters, workshops, etc.)
  • HVAC: ductwork, air handler, and system components that will heat and cool the home

Stay engaged during this stage. Once drywall goes up, moving an outlet or rerouting a duct becomes a demolition job. If you want a specific outlet placement, a dedicated circuit for a gym, or added lighting in a closet, confirm those details with your builder now.

Plumbing, electrical, and mechanical (HVAC) inspections are each conducted separately, typically three distinct visits. All three must pass before the walls get closed.

Timeline for this stage: typically 1 to 2 months.

Once the systems are approved and in the walls, the building gets sealed up.

Step 12: Insulation

Insulation won't make it into your family photos, but it will show up in your utility bills every month for the life of the home.

It's installed in exterior walls, the attic, and any floors above unfinished spaces. The most common types in Texas residential construction are fiberglass batt, blown-in cellulose, and spray foam. Each has different performance characteristics and price points, and the right choice depends on the area being insulated and your energy goals.

Attic insulation deserves special attention in Texas. Summer heat gain through the roof is one of the biggest drivers of air conditioning costs in Southeast Texas. A properly insulated attic, combined with energy-efficient HVAC and windows, can meaningfully reduce what you spend on utilities over the life of the home.

After insulation is installed, an inspection is required before drywall can go up.

Timeline for this stage: typically 2 to 4 weeks.

With insulation approved, the interior transformation begins in earnest.

Step 13: Drywall and Interior Finishes

This is the longest stretch of the home building process for most custom builds in Texas, and it's the stage where your choices from the design phase finally become real.

Drywall panels go up on walls and ceilings, taped, finished, and primed. Outside, brick, stone, stucco, or siding is applied to the exterior simultaneously. Then interior work accelerates across multiple trades at once.

Structural and surface finishes:

  • Interior doors are hung
  • Trim, baseboards, and crown molding are installed
  • Flooring (hardwood, tile, carpet, or vinyl) is laid throughout
  • Paint is applied, typically two coats after primer

Fixtures and mechanical trim-out:

  • Cabinets are set in kitchens, bathrooms, and laundry areas
  • Countertops are measured, fabricated, and installed
  • Plumbing fixtures (sinks, toilets, tubs, showers) are set and connected
  • Light fixtures, outlets, and switches are installed and live
  • HVAC registers and equipment are completed
  • Appliances are installed if included in the build

Outside, the driveway and walkways are poured, final grading ensures drainage flows away from the home, and landscaping is installed.

Custom cabinetry, specialty tile, and hardwood flooring have long lead times and require more precise installation than standard materials. Together, finishes account for 25% or more of the total build timeline, which is exactly why locking in your selections before construction starts is worth the effort in Step 4.

Timeline for this stage: typically 6 to 10 weeks, longer for complex or luxury builds.

Once the finishes are in, it's time for the home to face its official review.

Step 14: Final Inspections

Before you can move in, your home has to pass a final inspection conducted by the local building authority.

The inspector reviews the completed home against the approved plans and applicable building codes. If everything checks out, the municipality issues a Certificate of Occupancy (C.O.), the official document confirming that the home is safe and legally approved for people to live in.

If code-related issues are found, they must be corrected and re-inspected before the C.O. is issued. A builder who's scheduled proactive inspections throughout construction rarely encounters surprises at this stage. Most lenders also require an independent appraisal of the completed home before the construction loan converts to a permanent mortgage.

With the C.O. in hand, the process moves to your final personal review of the home.

Step 15: The Blue Tape Walkthrough

The final inspection clears the home legally. The blue tape walkthrough clears it personally.

You'll walk through every room with your builder's representative, testing systems, examining finishes, and marking anything that doesn't meet expectations with blue painter's tape. Each piece of tape becomes a line item on the builder's punch list, to be repaired before you take ownership. The tape is used specifically because it's visible, sticks cleanly to walls and surfaces, and comes off without damaging paint or finishes.

Don't underestimate this step. A new home can look move-in ready while still carrying issues that are far easier and cheaper to fix while the builder's still responsible. Common items caught during a blue tape walkthrough include:

  • Paint drips or uneven coverage
  • Cabinet doors or drawers that are misaligned
  • Plumbing fixtures with weak water pressure or slow drainage
  • Electrical outlets that don't work
  • Trim not seated flush against the wall
  • Windows or doors that don't open and close smoothly
  • Grout or caulk gaps in tile work

Set aside at least two to three hours. Bring your phone to document issues, a flashlight for dark corners and closets, and a phone charger to test outlets. Anything missed here becomes your cost to fix after closing.

After the walkthrough, your builder compiles a formal punch list, completes the repairs, and you'll do a second pass to confirm everything's been addressed before signing the final paperwork.

Step 16: Convert Your Construction Loan Into A Traditional Mortgage

After your custom home is ready, the next step is to convert your construction loan into a traditional mortgage.

Differences Between Construction Loans and Standard Mortgages

Construction Loans: These are short-term loans specifically designed to cover the cost of building a new home.

Lenders usually charge higher interest rates for construction projects because they consider them risky. Borrowers usually make interest-only payments based on the amount of money disbursed during construction. This arrangement helps manage cash flow during construction when you may also be covering the cost of temporary housing.

Standard Mortgages: Unlike construction loans, standard mortgages are long-term financing options meant for purchasing existing homes. These loans come with a variety of term lengths and interest rate options, including fixed and adjustable rates.

Payments on standard mortgages include both principal and interest, which covers the total loan amount from the start.

Interest Rate Considerations

Construction loans often start with variable interest rates. These reflect the short-term nature and higher risk of the building period. When converting a construction loan to a traditional mortgage, the interest rate may change.

After finishing construction, you can convert these loans into a standard mortgage with either a fixed or adjustable rate.

Fixed-rate mortgages make payments more predictable. Homeowners who value consistent budgeting tend to prefer this type of loan. For tips on staying within budget while designing your home, see this article.

Switching to a traditional mortgage typically involves a "closing process." This process is similar to what you experience when buying a resale home. It includes finalizing the mortgage agreement, setting the terms, and locking in the interest rate.

Review all the details carefully. Make sure they align with your finances. Also, compare them to the initial estimates given by your builder.

You can convert your loan to help you plan your finances better. This makes it easier for you to move from constructing your home to owning it since it provides you with an understanding of what to pay each month.

Step 17: Closing and Move-In

With the punch list resolved and the C.O. in hand, you're ready to close.

Closing on a new construction home works similarly to closing on a resale property. You sign the final mortgage documents, pay any remaining closing costs, and officially take ownership. If you used a construction-to-permanent loan, this is where construction financing converts to your permanent mortgage and regular monthly payments begin.

Most builders conduct a home orientation at or just after the walkthrough, walking you through how your systems operate:

  • How to set and program the thermostat
  • Where the main water shutoff is located
  • How to reset GFCI outlets
  • How the irrigation system works
  • When to schedule your first HVAC filter change

Keep all of this documentation. Your warranty package, appliance manuals, and maintenance schedules will save you real money throughout your first year of ownership.

Step 18: Make Sure You Understand Your Warranty

Understanding your home warranty is the best way to protect your investment. A new home warranty covers various parts of your house. These normally include the foundation, roofing, and structural integrity, along with major systems like heating and air conditioning.

However, warranties can vary significantly, so it’s essential to know the specifics of yours. Get clarity on what it covers and for how long, who to contact if an issue arises, and the process for filing claims.

Also, be aware of any maintenance obligations required to keep your warranty valid. Sometimes, failing to perform necessary upkeep can void certain warranty protections.

Understanding your warranty thoroughly guards you against unexpected expenses and ensures that any issues are easy to address immediately.

Interior shot of a finished kitchen built by Dunn & Stone Builders in Texas

Step 19: Maintain Your Home To Keep The Resale Value High

Moving into your newly built custom home is an amazing experience. Selling may be the last thing on your mind, but increasing your home's value is still crucial to protect your investment long term.

Here are five key ways to preserve or enhance your home's value:

  1. Regularly Maintain Major Systems: Keep your HVAC, plumbing, and electrical systems in top condition through regular checks and servicing. This prevents major breakdowns so that your home remains efficient and functional.
  2. Update and Refresh Exteriors: Curb appeal has a significant impact on home value. Maintain the exterior paint, landscaping, and ensure features like the roof and gutters are in good condition. Periodic updates can keep your home looking fresh and well-cared for.
  3. Modernize Key Areas: Kitchens and bathrooms are make a massive difference in a home’s value. Keeping these spaces modern, functional, and aesthetically pleasing makes it easier to resell your home in the future.
  4. Upgrade For Energy Efficiency: Invest in energy-efficient appliances, windows, and insulation. These improvements will reduce your utility bills. They also make the home highly attractive to future buyers looking for eco-friendly, cost-effective homes.
  5. Keep Interior Design Timeless: To make your home appealing to more buyers, stick to neutral decor and finishes. Personalize with timeless design choices for a custom touch. Use high-quality materials and classic designs that won’t go out of style at any time soon.

If you’re at the beginning of your home building journey and unsure where to start, consider booking a free consultation with Dunn & Stone Builders.

As one of the most trusted names in Texas custom homes, we can guide you through each phase of building a custom home from start to finish.

How Long Does the Home Building Process Take in Texas?

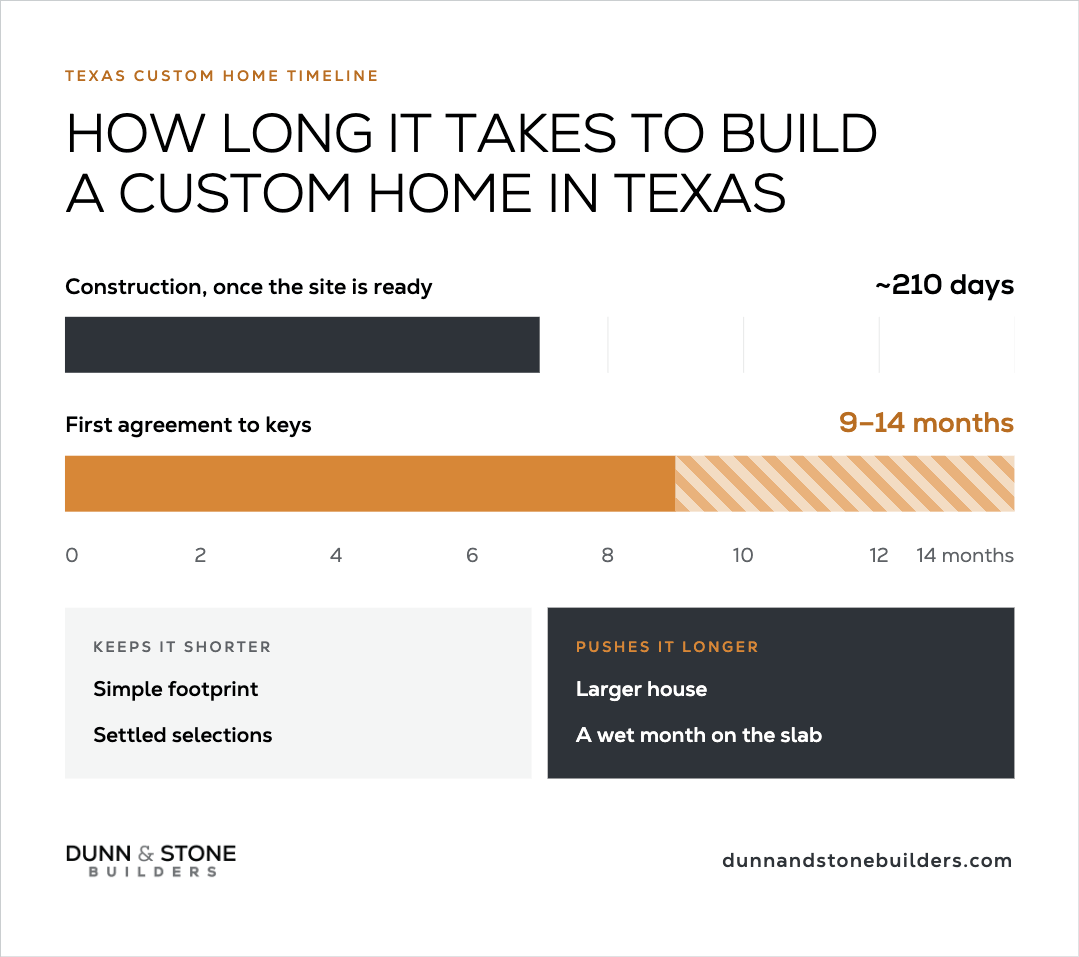
Plan for 9 to 12 months from breaking ground to move-in for most custom homes in Texas, consistent with U.S. Census Bureau data on single-family construction timelines. (For a deeper look at what affects that window, see our full guide on how long it takes to build a house.) Add another 2 to 6 months for pre-construction (design, permits, and financing), and the full timeline from initial planning to move-in is typically 12 to 18 months.Homes with simpler designs and standard materials can sometimes be completed in 6 to 7 months once construction begins. Larger homes (4,000+ square feet), complex designs, imported materials, or permit backlogs can push timelines beyond 12 months.

What Can Slow Down the Home Building Process?

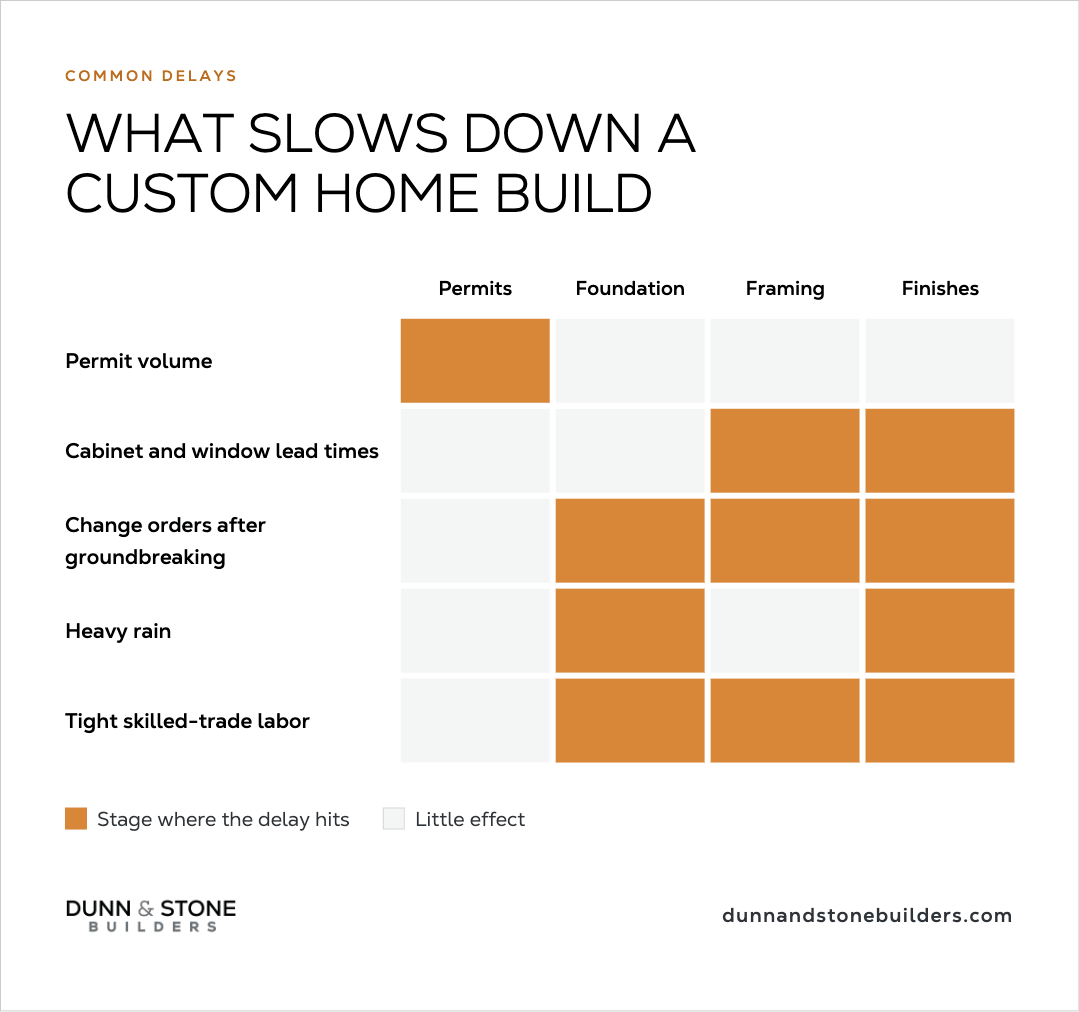
Even with careful planning, delays happen. Knowing where they typically come from helps you prevent the preventable ones.

Permit backlogs. In fast-growing areas of the Houston metro, permit approval takes longer due to high application volume. Starting the process as soon as your plans are finalized is the most effective way to avoid this delay cascading into others downstream.

Material lead times. Custom cabinetry, specialty tile, imported fixtures, and other long-lead items need to be ordered well in advance. A builder who plans for these during the design stage keeps them from stalling construction later.

Change orders. Changes made after construction begins are among the most common sources of both delay and cost overruns. Finalizing your selections before breaking ground is the most protective step you can take.

Weather. Heavy rain, flash flooding, and extended periods of extreme heat can pause work for days or weeks in Southeast Texas. Most experienced builders build a weather buffer into their timelines, but unusual seasons still push schedules.

Subcontractor availability. Labor shortages in skilled trades affect scheduling across the industry. A builder with strong, long-standing subcontractor relationships is better positioned to keep crews on schedule than one assembling a team project by project.

Frequently Asked Questions

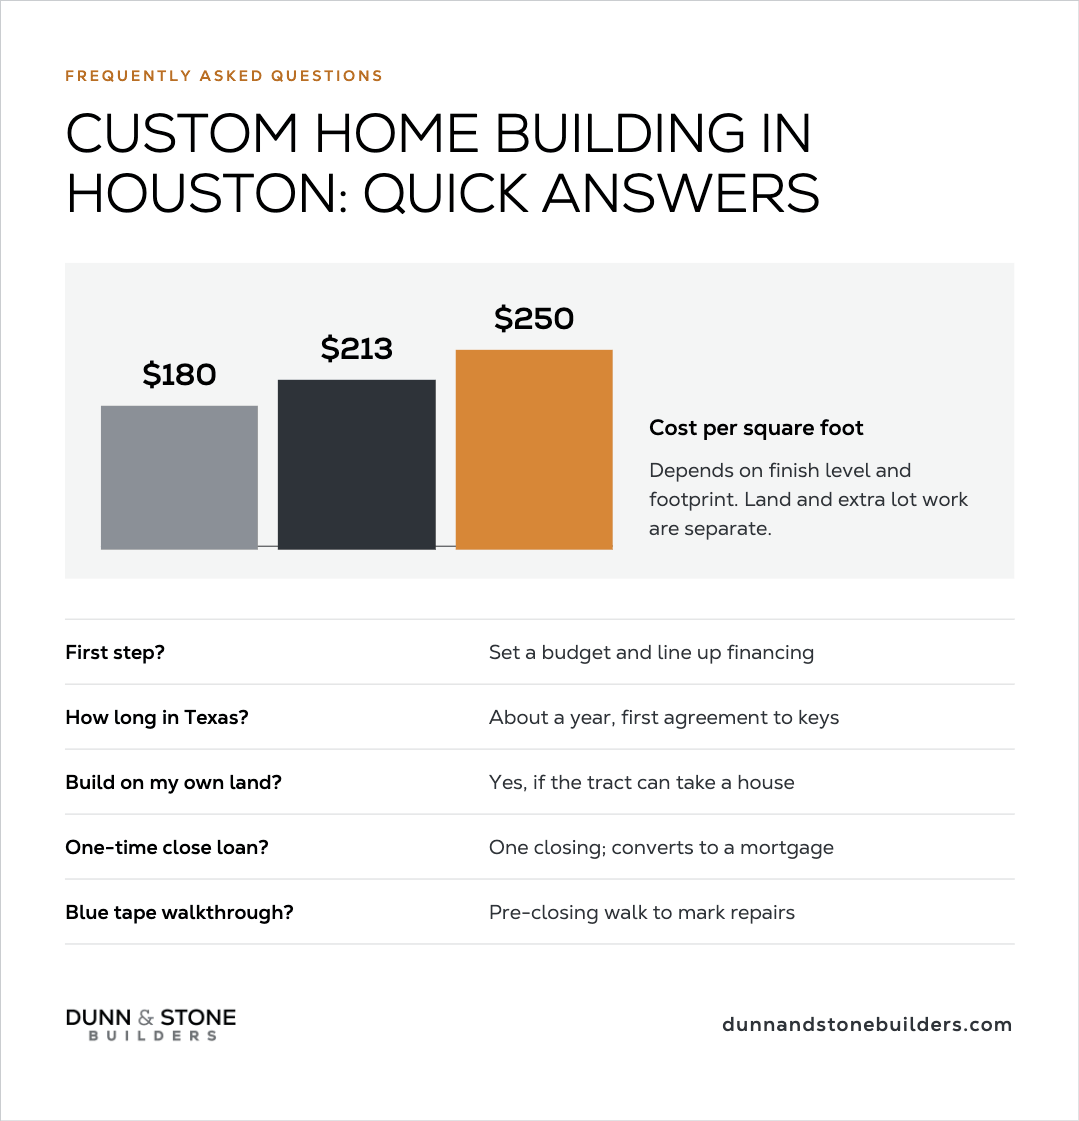
What is the first step in the home building process? Set your budget and secure financing before anything else. Total project costs for a custom home in Texas commonly range from $350,000 to $700,000 or more. Knowing your number before you choose a floor plan or look at land keeps every other decision grounded.

How much does it cost to build a house in Houston? Building a custom home in Houston typically costs $150 to $300+ per square foot. Total costs including land, site prep, and construction commonly range from $350,000 to $700,000 or more, depending on size, finishes, and lot conditions. Use our cost to build a house calculator to estimate your project.

How long does the home building process take in Texas? Most custom homes in Texas take 9 to 12 months to build from breaking ground to move-in. Add 2 to 6 months for pre-construction (design, permitting, financing), and the full process from initial planning to move-in is typically 12 to 18 months.

Can I build a custom home on my own land? Yes. Dunn & Stone Builders specializes in build-on-your-lot projects throughout the Houston area and surrounding communities. We can help you evaluate your land and design a home that fits your specific lot, budget, and lifestyle.

What is a one-time close construction loan? A one-time close loan (also called a construction-to-permanent loan) covers land purchase and construction costs, then converts to a standard mortgage when the home is complete. There's a single closing, which reduces fees and simplifies the financing process.

What is a blue tape walkthrough? A blue tape walkthrough is a pre-closing inspection where you and your builder's representative walk every room, using blue painter's tape to flag issues for repair. It's your last opportunity to catch problems while the builder is still responsible for fixing them.

What's the difference between a custom home and a spec home? A spec home is built by a developer without a specific buyer in mind. You purchase it as-is or with limited choices. A custom home is designed and built specifically for you, on your lot, with full control over the floor plan, finishes, and features. Semi-custom homes sit in between, starting with a proven floor plan that you personalize.

Do I need a real estate agent to build a custom home? Not necessarily. When you're building on your own lot with a design-build firm, a real estate agent typically isn't part of the process. Where an agent adds value is in helping you find and negotiate the purchase of a lot, especially if you're evaluating multiple properties in different communities.

What happens after I move in? Most builders offer a one-year warranty covering workmanship and materials, with longer coverage for structural components. Document any issues in writing during your first year and report them through your builder's warranty process. Routine maintenance (HVAC filters, caulking, gutters) keeps your new home in top shape long-term.

Ready to Start the Home Building Process?

You now have the full picture: every stage, every decision point, every place where things can go right or get stuck.

Building a home in Texas is a predictable process when you understand it and have the right team walking it with you. The families who end up most satisfied are the ones who came in informed, stayed engaged throughout, and worked with a builder who communicated clearly at every turn.

At Dunn & Stone Builders, we've been helping Texas families build custom homes for over 30 years. We build on your lot, offer proven and customizable floor plans, and stay with you from the first conversation to the day we hand you your keys.

Ready to take the first step? Contact our team for a free consultation. We'll review your lot or help you find one, walk you through our floor plan options, and give you a realistic timeline and budget range for your specific project. No pressure, just a clear picture of what building your home actually looks like.

Related Reading:

Download The Blue Tape Walkthrough Checklist

Thank you! Your submission has been received!
Oops! Something went wrong while submitting the form.

Related Posts